Delivery Settings
Delivery settings is one of the most important settings for the app. Delivery settings mean which settings your app will use to send mail. Most of the mail in app are Campaign mail, user invitation mail, password reset mail, Notification mail.
There are three different place to set up delivery setting in the app:
-
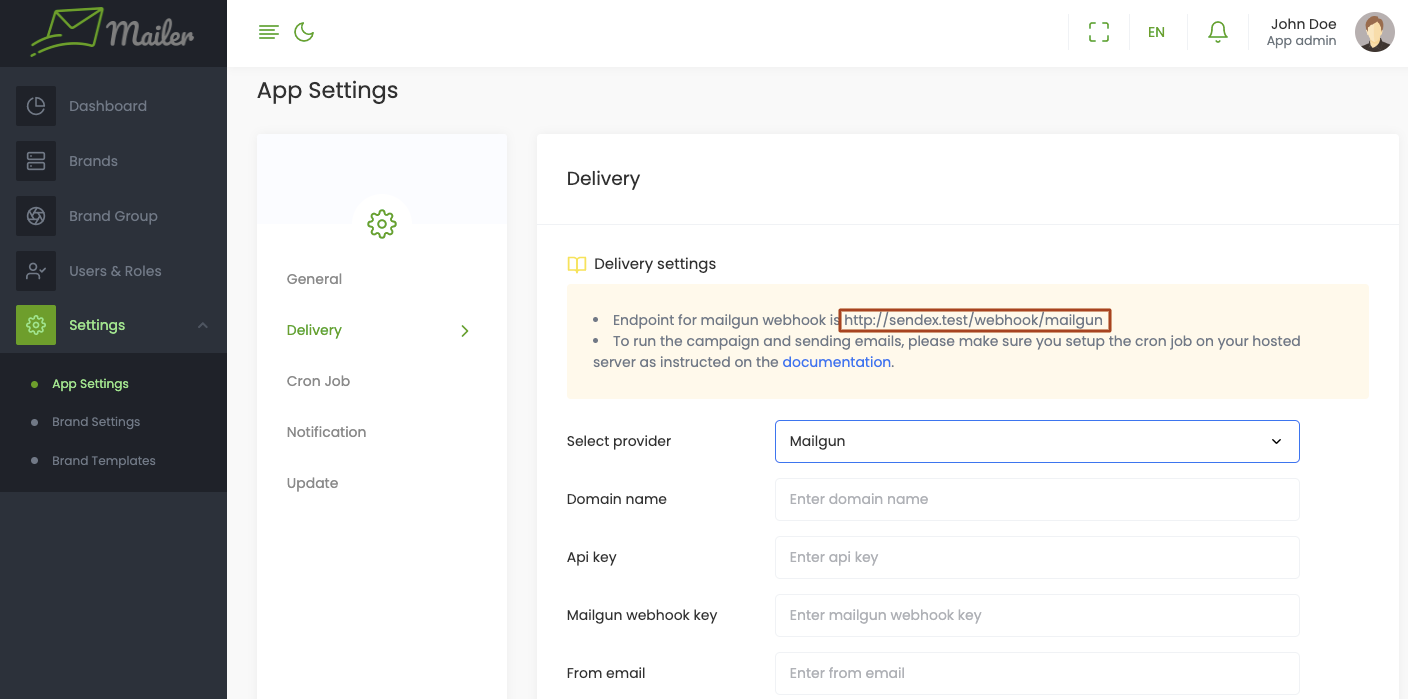
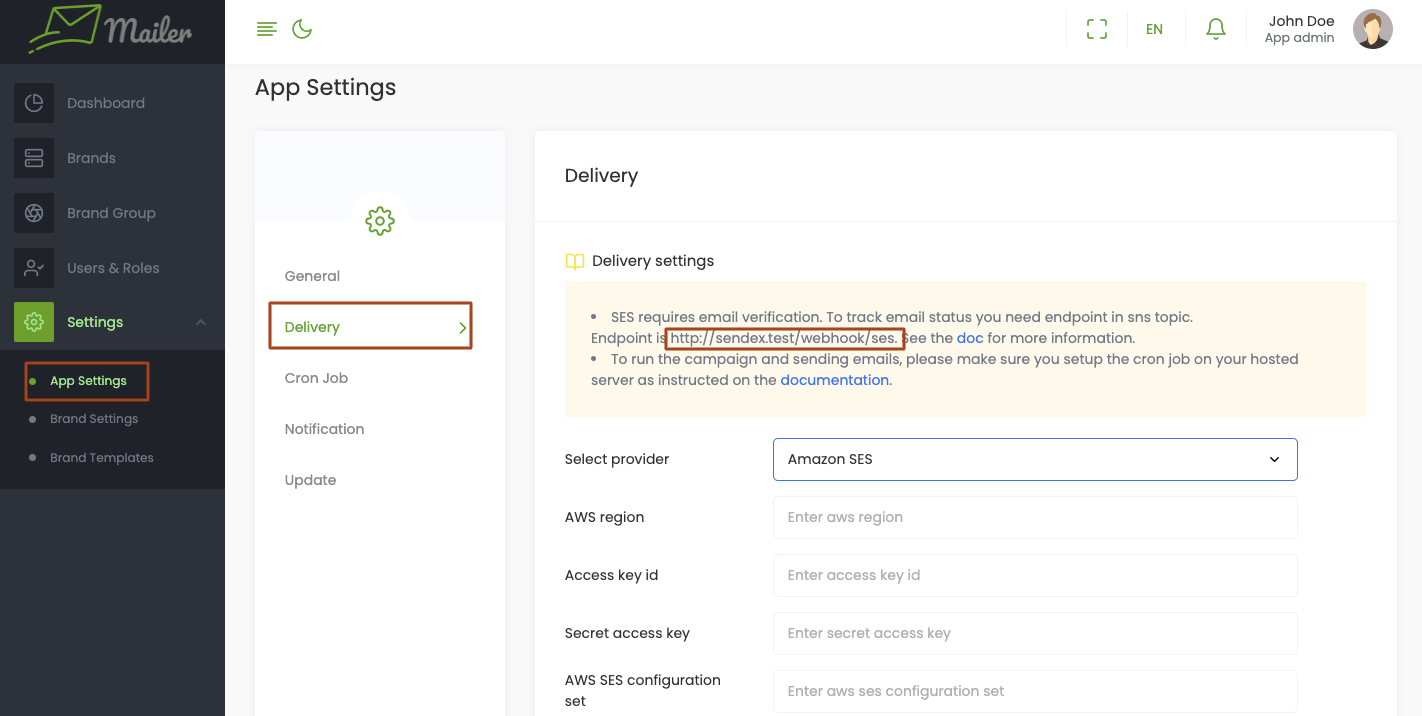
App delivery settings: Settings > App Settings > Delivery
App delivery settings will mostly use for user invitation and password reset mail. Also if you choose mail notification channel from notification settings then this will also use for sending notification mail. You can find this settings from App panel navigation menu.
-
Global brand delivery settings: Settings > Brand Settings Delivery
Global brand delivery settings mean all brand will use this settings as long as the brand doesn't provide its own delivery settings. This settings will mostly used for sending campaign mail and user invitation mail from Brand panel. In this section you can choose a settings which you saved previously in app delivery settings and save that as brand global delivery setting.
-
Brand Delivery Settings: Brand panel > Settings > Delivery
This settings is brand specific. That means if you don't want use global brand settings for that brand then you can set up your own delivery settings
You have three option to set up delivery settings:
-
Mailgun
To set up Mailgun you will be needing Domain name (Here is how you can add domain in mailgun), API key, Webhook signing key. From name, From emailFirst, you need to “Verify your domain” by the following process.

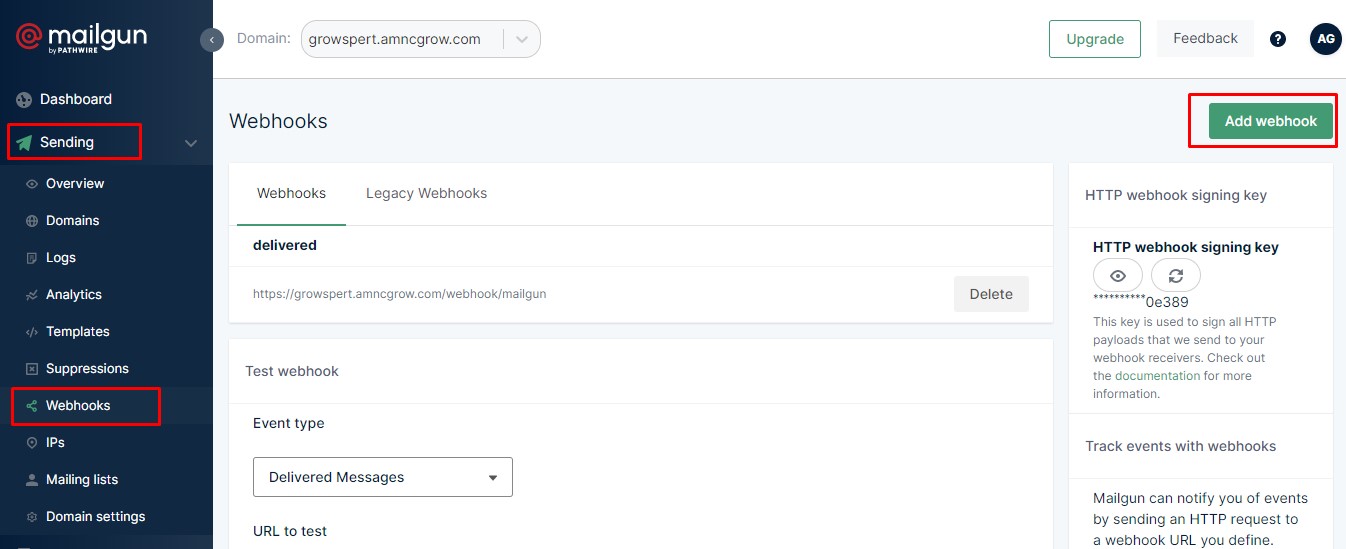
Then, you have to set a webhook in Mailgun. The endpoint for the webhook is like: https://your-domain.com/webhook/mailgun. Also, get this endpoint from App settings.
You can find the Webhook settings in the Sending. Click “Add Webhook” > Select Event type: Delivered Messages and create webhook..
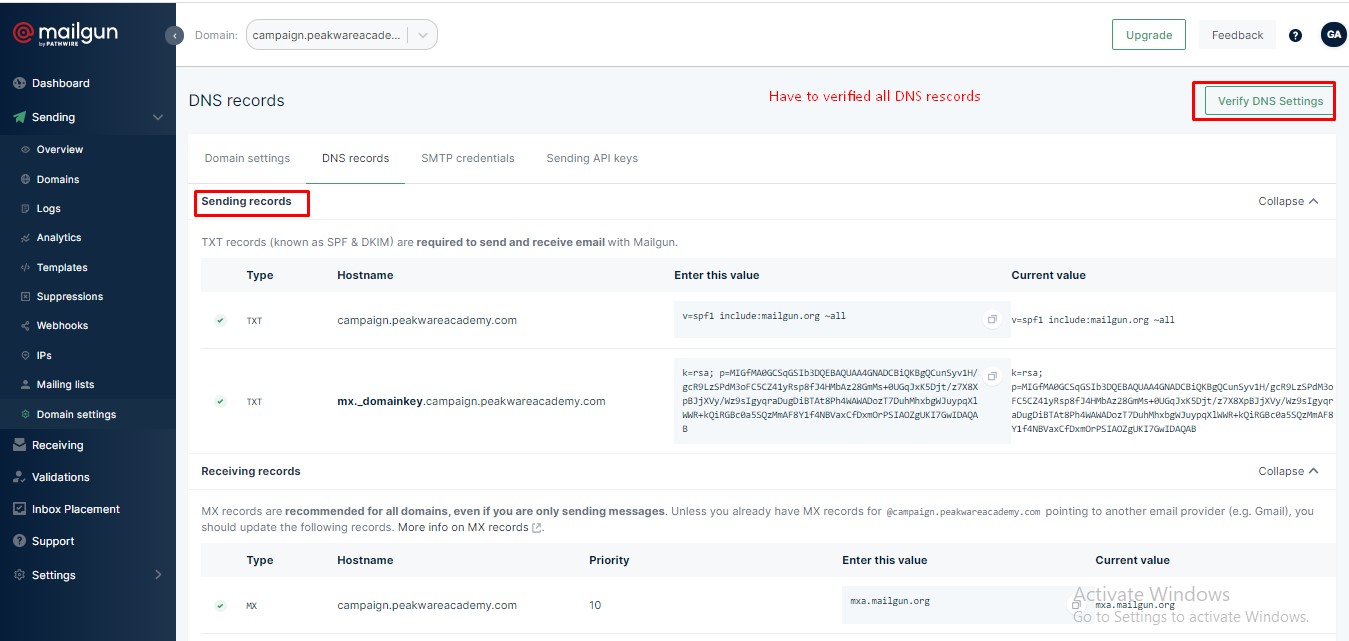
Go to domain settings(Sending > Domain settings) to enable click, open tracking from Mailgun dashboard. Before that, Mailgun requires The CNAME record is necessary for tracking opens, clicks, and unsubscribes. For that, you have to complete the DNS records setup within your cPanel (Zone editor)/Control panel/server.
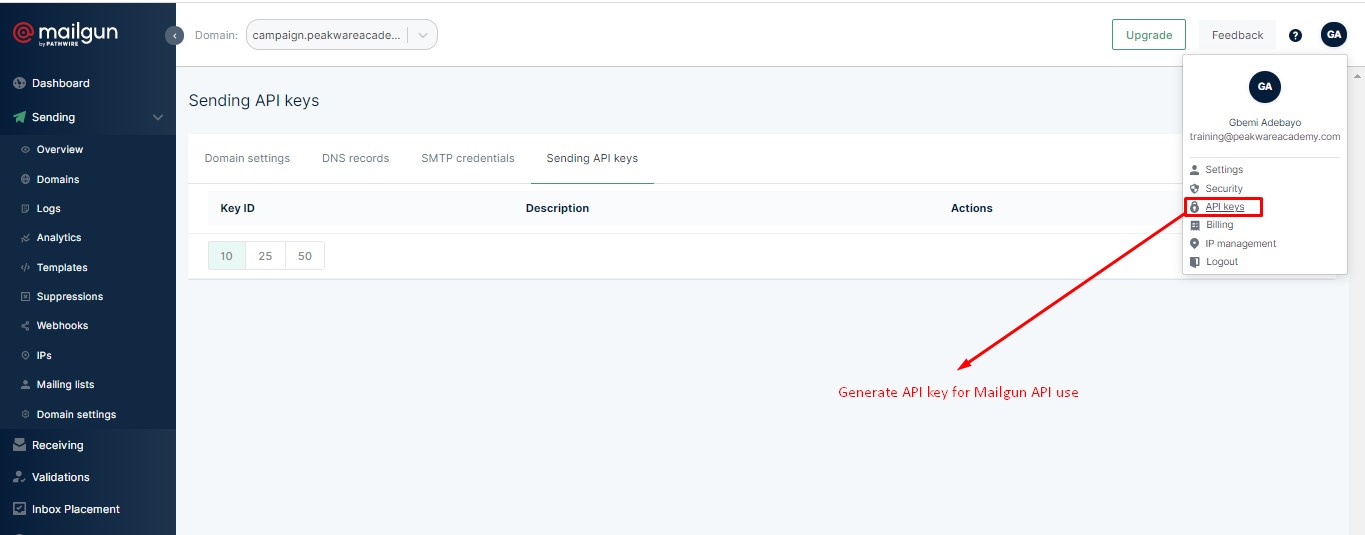
You will get API key from Settings > API security > API Key
-
Amazon SES API
Amazon SES needed Api Region, Access Key ID, Secret Access key, Configuration set name, From name and From email to set up.Step 1:To track mail status from SES you have to create an Amazon SNS topic. First, login in Aws ses console with your root user. Go to search bar and search “ Simple Notification Service (SNS)”. Click on “Topics” from the left side menu. Tab the “Create topic” and create a new topic with Standard type.


After creating a topic go to the subscription option at the bottom of the topic. Then click on the “create subscription”. Choose Topic ARN (which topic you have created), choose http or https protocol depends on your domain protocol and Enter the end point (which you will get it from your application delivery settings after selecting Amazon SES) and finally create subscription.
 N.B: The global end point is https://your-domain.com/webhook/ses and endpoint for specific brand is https://your-domain.com/webhook/your-brand-short-name/ses.
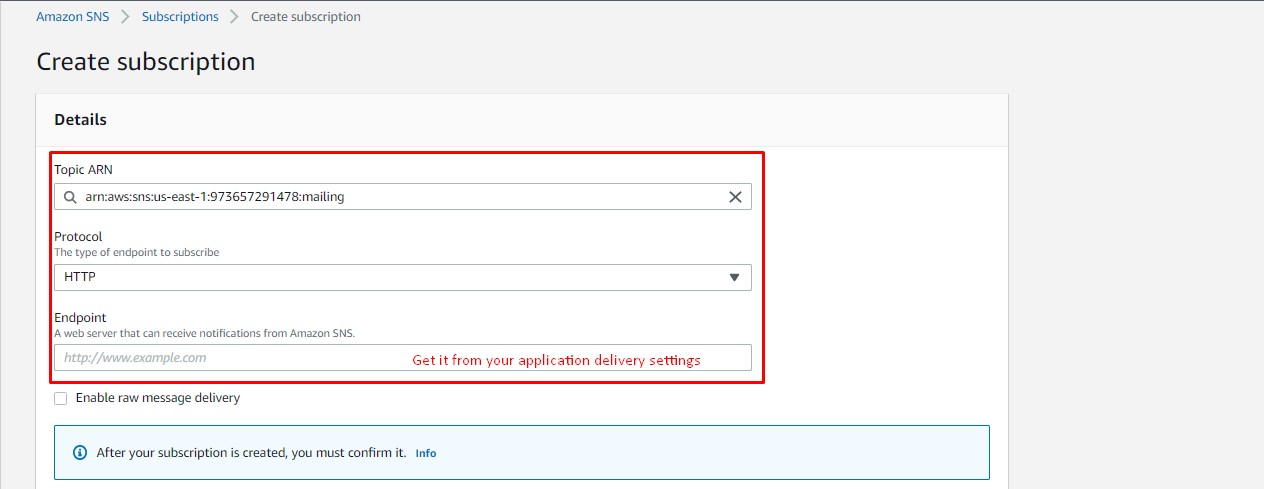
To verify that subscription request endpoint, go to the App panel Dashboard or brand (The brand short name you used) dashboard and you will see a section at top of the dashboard to verify the endpoint. Just click on confirm and that will verify the endpoint for Amazon SNS topic subscription. You can verify the endpoint for global settings or individual brands.
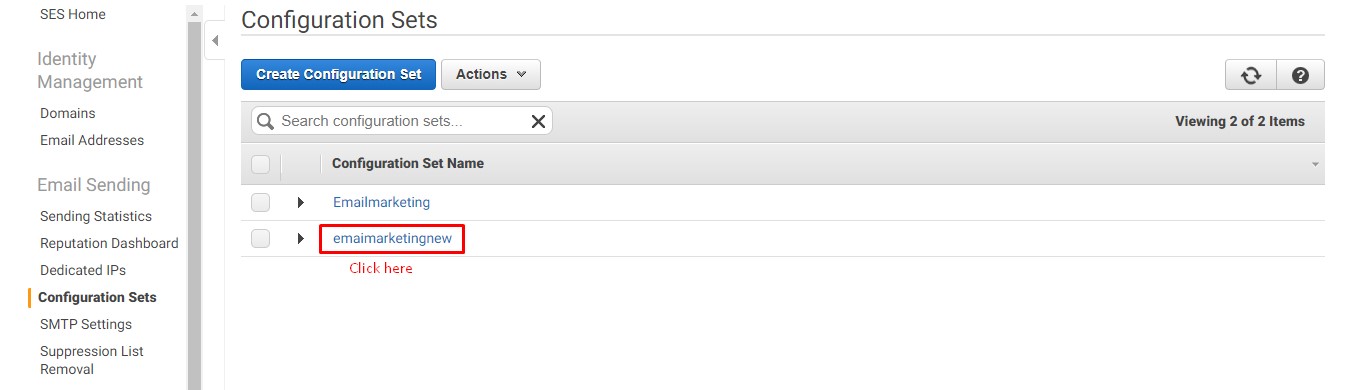
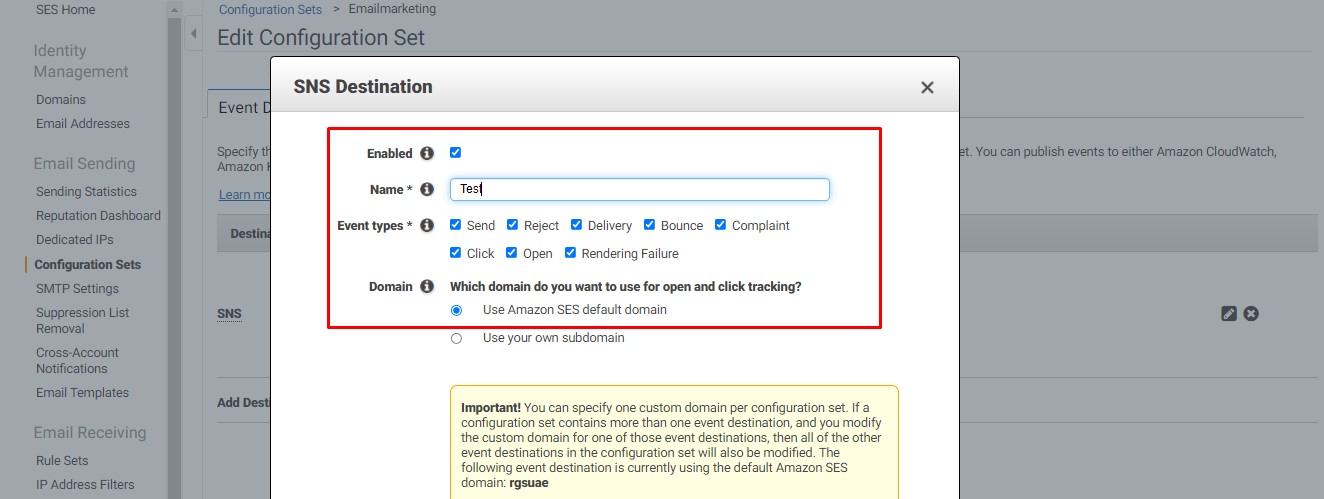
Step 2:Go to the search bar and search ”Amazon Simple Email Service”. After landing on SES Home, then go to the configuration set section from the left side menu. Create a configuration set by clicking create configuration set and give the name of your configuration set (You have to provide us this configuration set name while saving the ses configuration) and hit Create Configuration Set button.
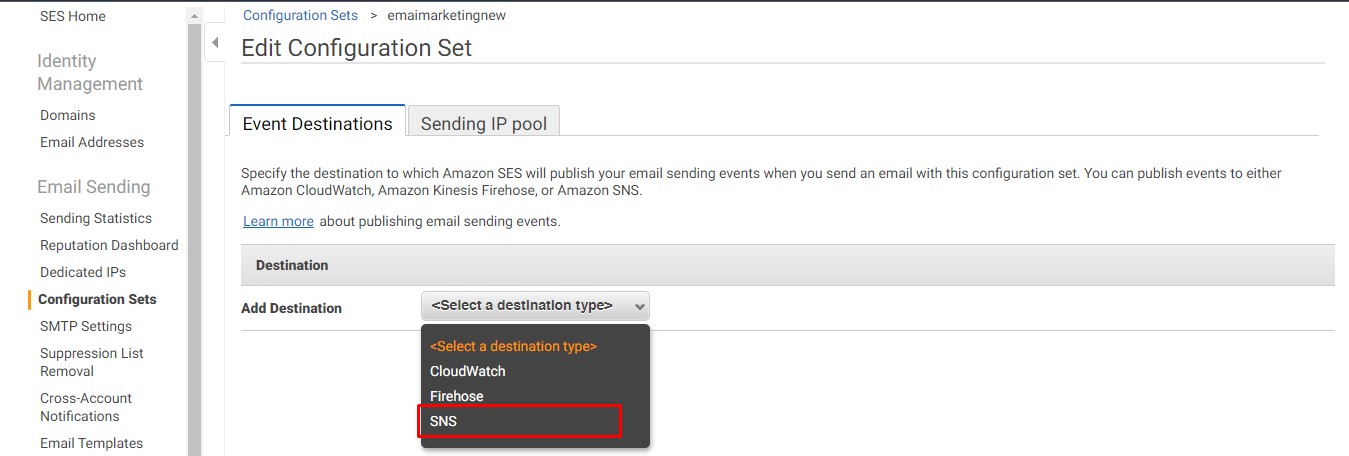
Click on the newly created configuration set name, you will see the details page. From the destination menu, choose an SNS topic and choose events you want to track, and hit the save button.
 Step 3:
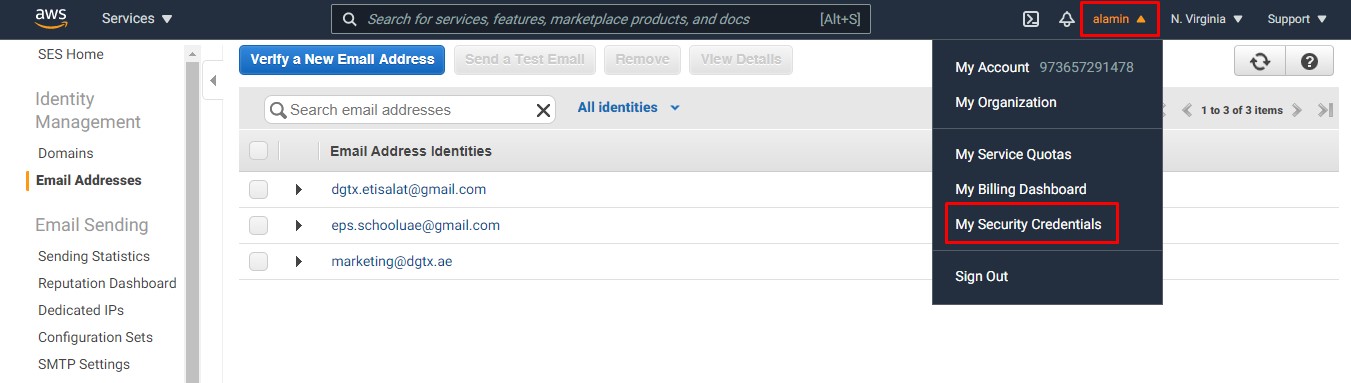
You also have to verify the email address which you are using as from email. Navigate to the Email address section from the left side menu and click on Verify a New Email Address and verify the email you want to use.
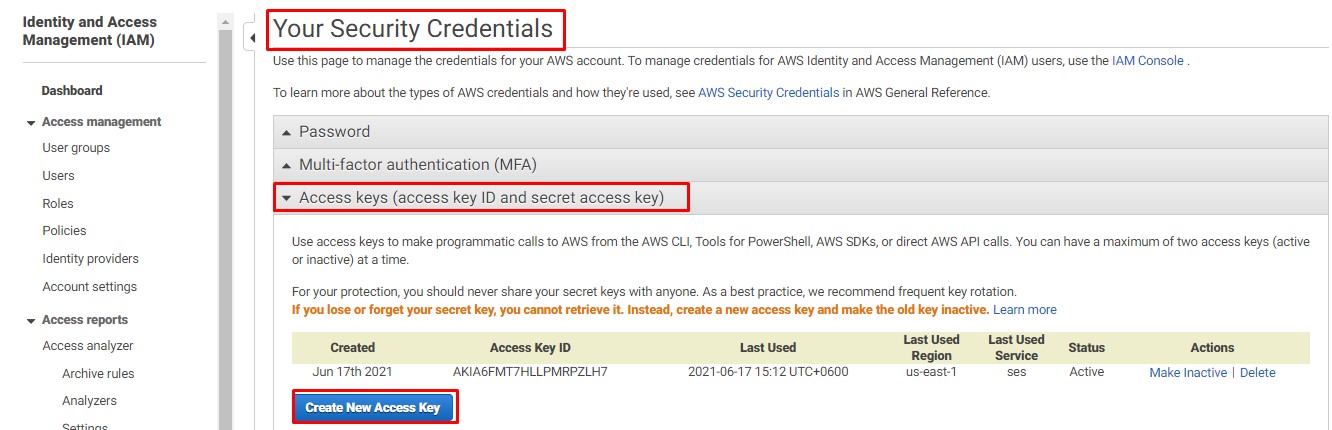
After completing the steps, click on your profile name from the top of right side, select “My Security Credentials” and get a landing page “Your Security Credentials”. Then go to “Access keys (access key ID and secret access key)” section and “Create new access key”.Finally you will get “Access Key ID, Secret Access Key” which is required in your application to set up Amazon SES delivery settings.
 N.B: In order to remove via amazonses.com from the mail you have to verify your domain to amazon ses. Follow this link to know how you can verify the domain.
AWS IAM user have at least access to these AWS IAM policies:
- AmazonSNSFullAccess
- AmazonSESFullAccess
-
SMTP
SMTP needed hostname, port, encryption, username, password, hourly quota, daily quota, monthly quota, From name and From email to set up.
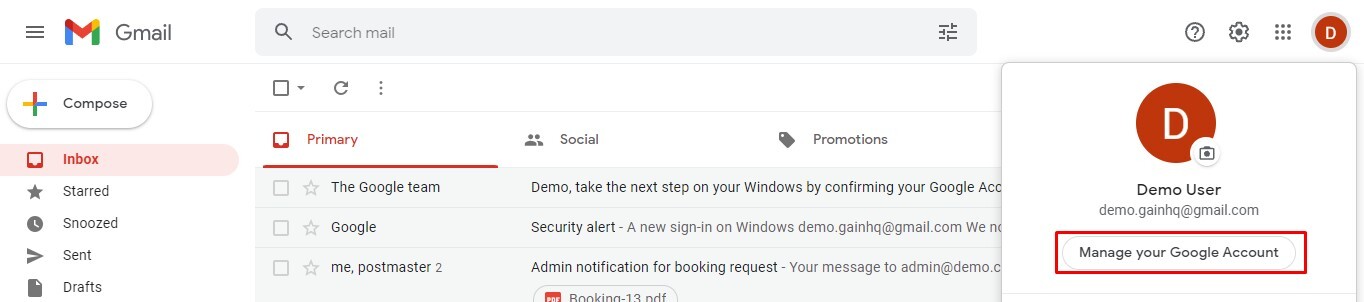
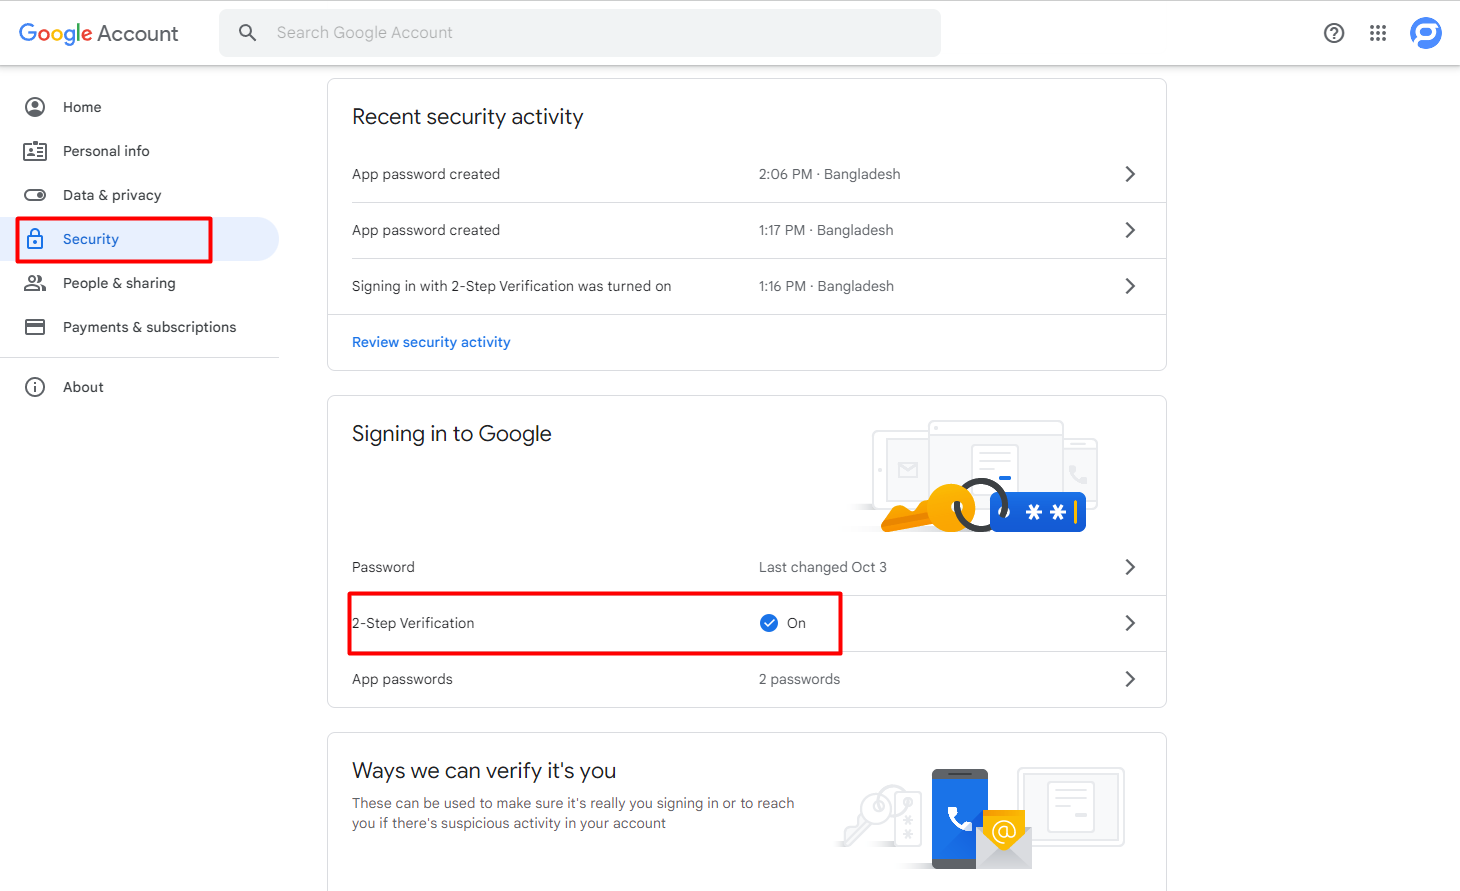
For Gmail SMTP email service: You have to enable 2-Step Verification (ON) and create App passwords from your Google account Security.
Click on your Google profile image (Right top side) > Click Manage your google account > Click Security (left side) menu > Scroll down and enable "2-Step Verification" from Signing in to Google section.
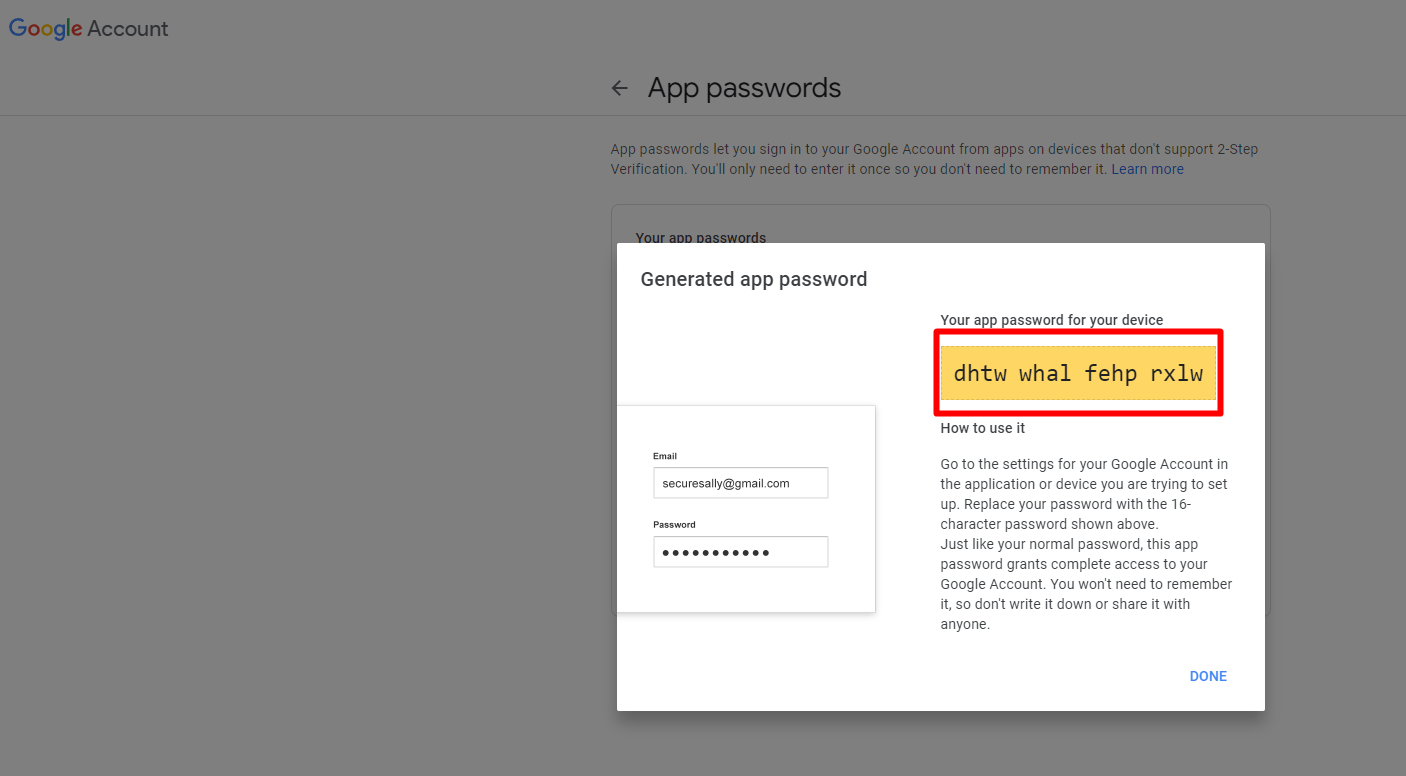
After enable 2-Step Verification, you will get an option “App password” > Go to there > Click Select App > Choose Other > Type any name > click Generate > Password will generate.
From name: Mailer Test
User name: demo@gmail.com
From email: demo@gmail.com
host: smtp.gmail.com
Port: 587 (Encryption type: TLS)
Port: 465(Encryption type: SSL)
Password: Generated app password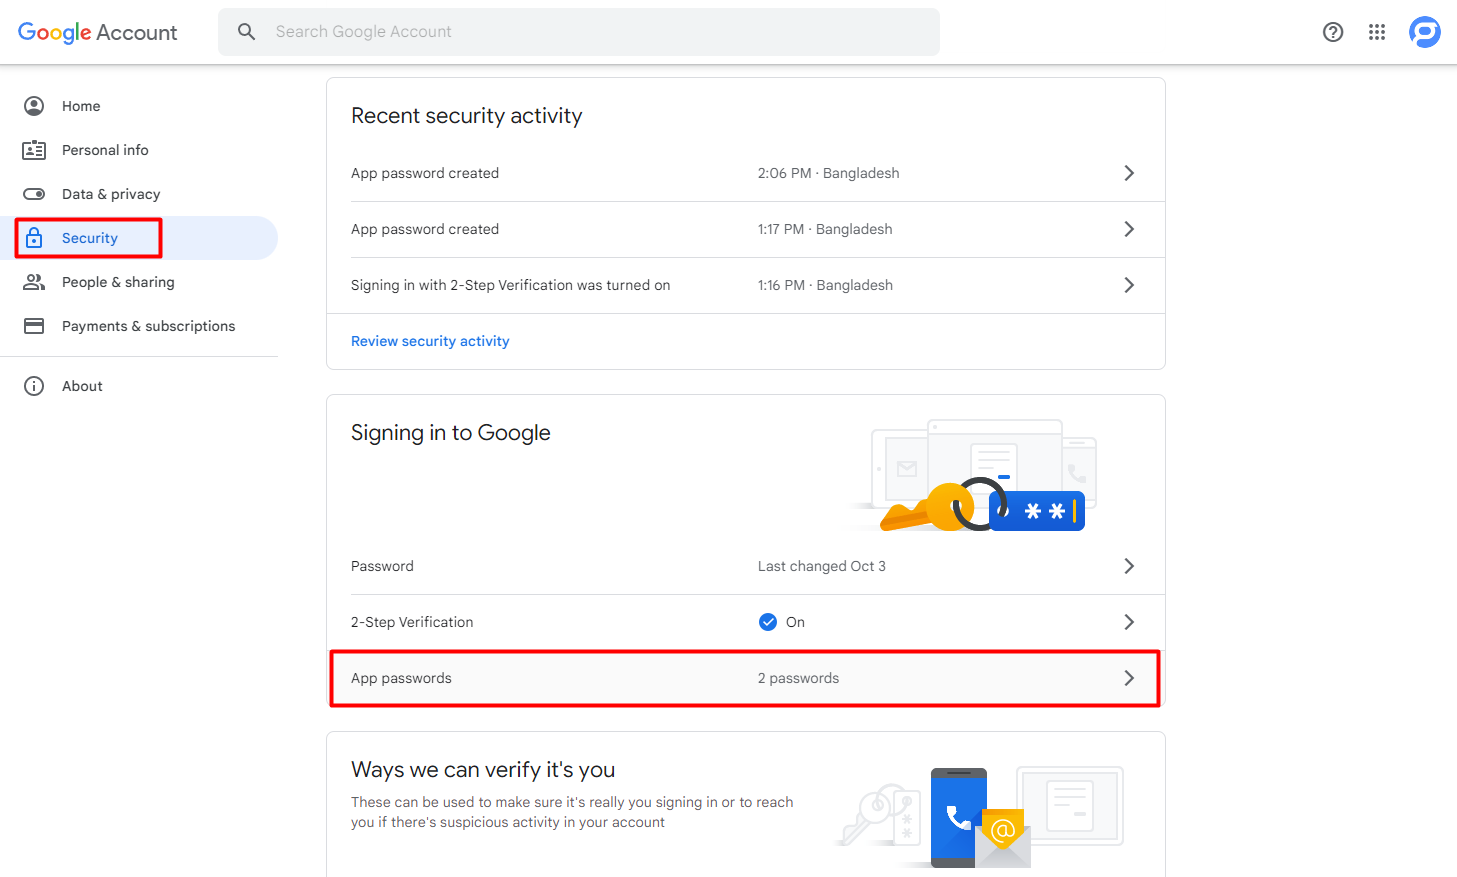


 Google Workspace or Google Cloud Identity users:
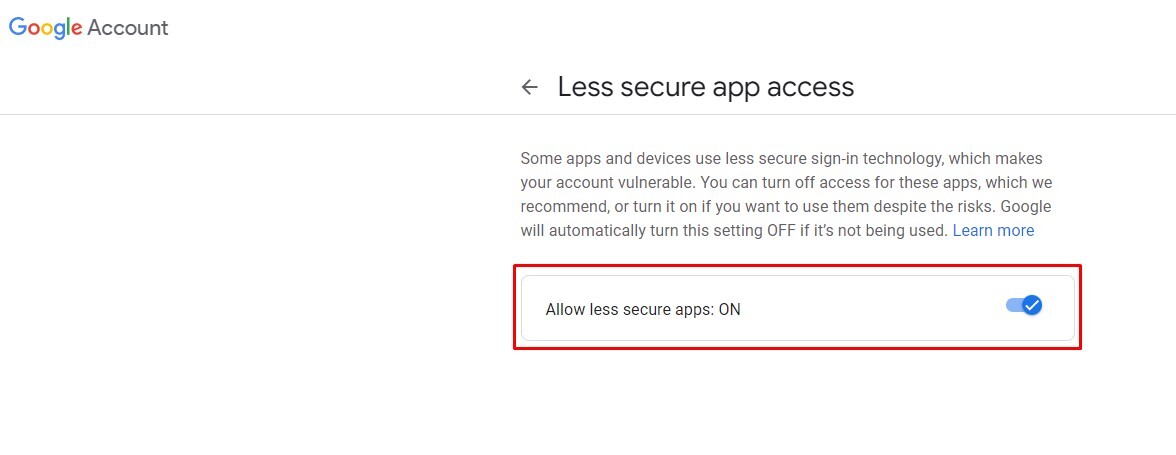
For Gmail sender email: You have to enable "Less secure app access" from your Google account security settings.
Click on your Google profile image (Right top side) > Manager your google account > Security (left side) menu > Scroll down and goto "Less secure app access" section > click "Turn on access" > do "Allow less secure apps: ON"

Set up queue and scheduler
* Adding delivery settings will not send the mail.
* To process campaigns we use scheduler and to send mail and process notification we use a queue.
You need to add one Cron Job for the scheduler and two Cron Jobs for the queue.
Run campaign scheduler
-
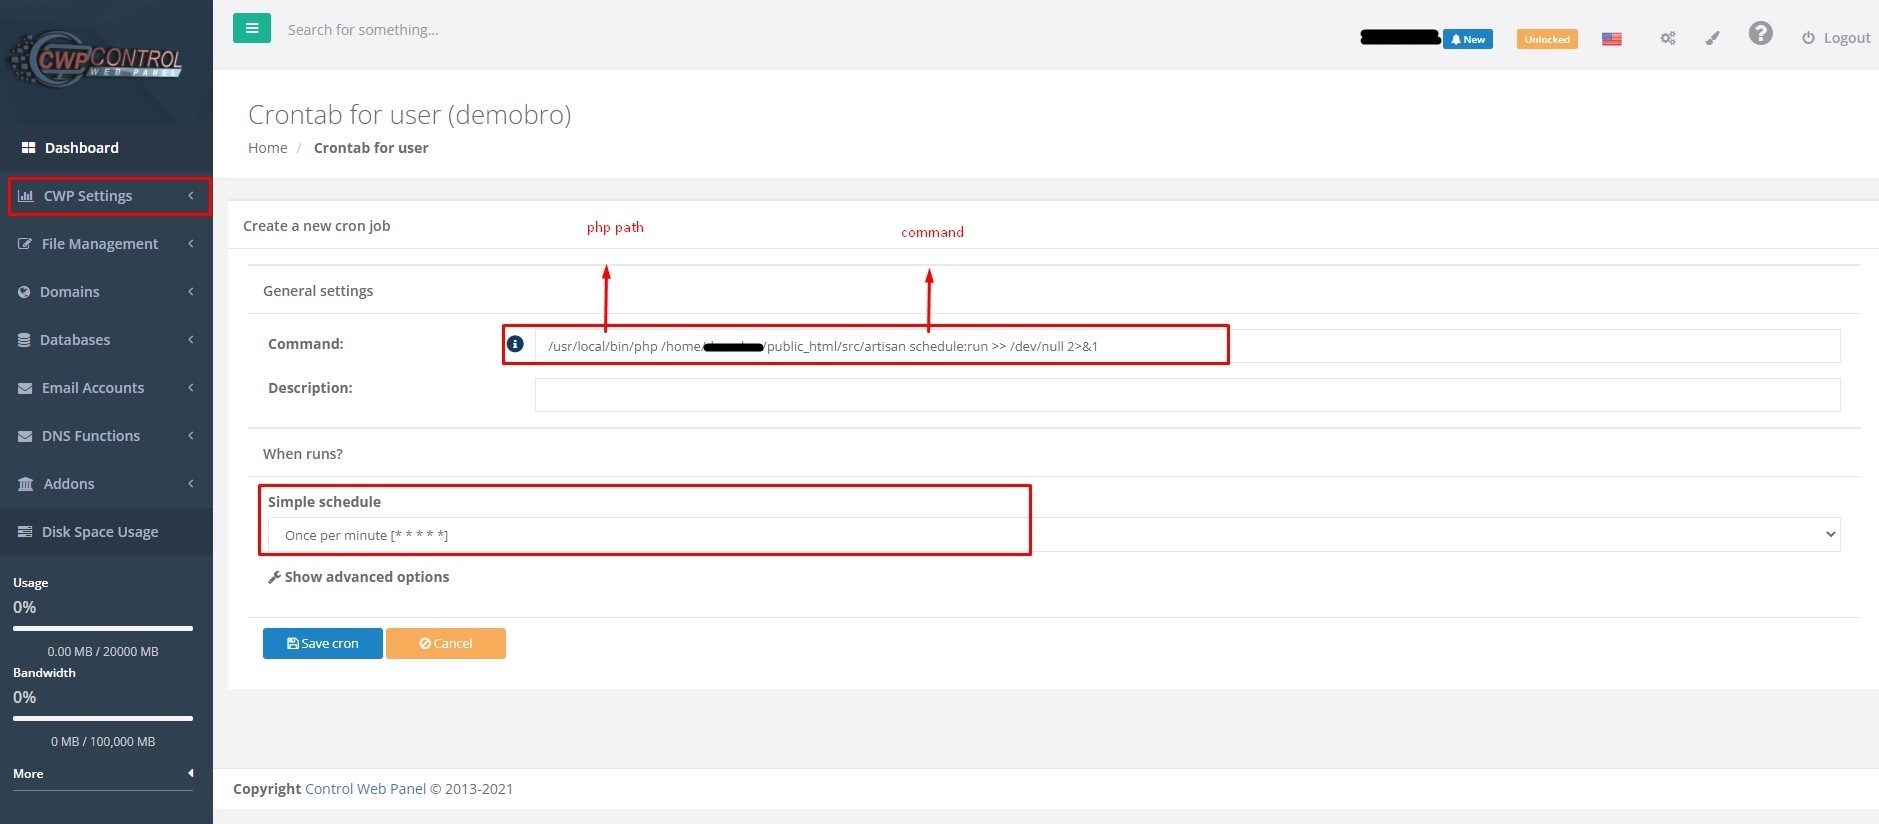
Search for the Cron Job in your cPanel.
-
Click and go into the setup page for your Cron job.
-
Select “Once per minute” from Common Settings.

-
Run this command in to the “Command:” field
/path/to/php /path-to-your-project/src/artisan schedule:run >> /dev/null 2>&1Example:
/path/to/php /path-to-your-project/src/artisan schedule:run >> /dev/null 2>&1
-
After completed all the cron jobs, you will view three cron jobs in your cPanel/server.

Run Cron Job for Queue
-
Again select “Once per minute” from Common Settings.
-
Select “Once per minute” from Common Settings.
-
Run this command in to the “Command:” field
                                            /path/to/php /path-to-your-project/src/artisan queue:work --sansdaemon --tries=3
                                            --queue=high
Example:
                                            /usr/local/bin/php /home/mailerrelease/public_html/Mailer-1.0.2/upload/src/artisan
                                            queue:work --sansdaemon --tries=3 --queue=high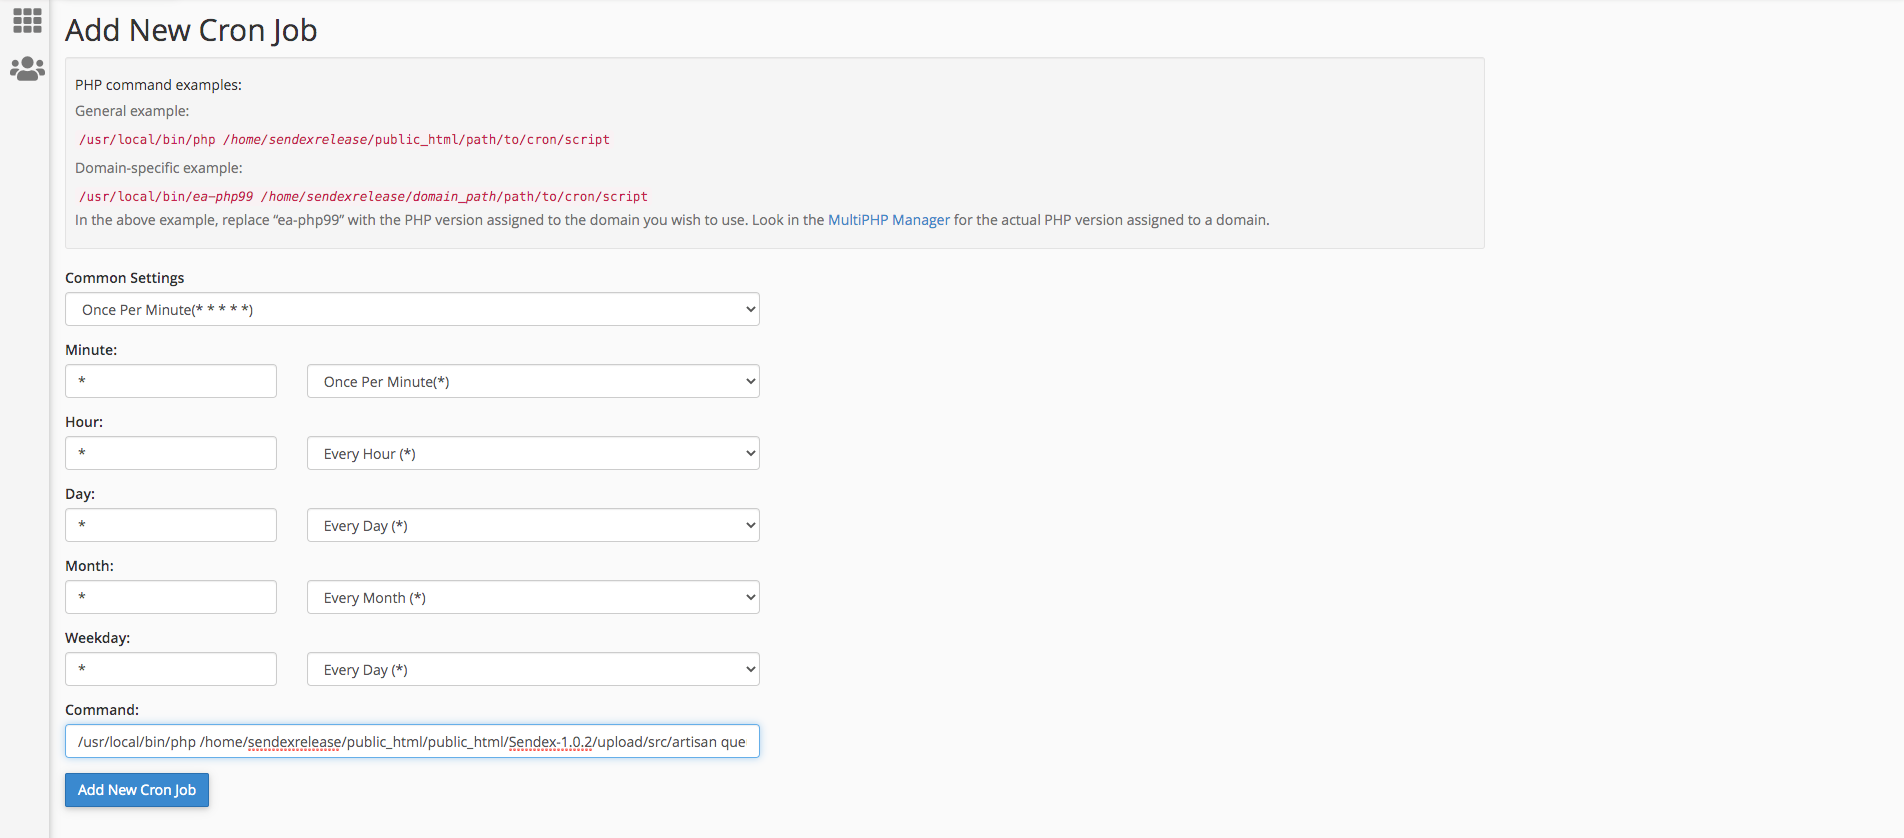
-
Again select “Once per minute” from Common Settings.
-
Select “Once per fifteen minutes” from “Minute” dropdown.
-
Run this command in to the “Command:” field
/path/to/php /path-to-your-project/src/artisan queue:work --sansdaemon --tries=3 --queue=default -
Example:
                                            /usr/local/bin/php /home/mailerrelease/public_html/Mailer-1.0.2/upload/src/artisan
                                            queue:work --sansdaemon --tries=3 --queue=default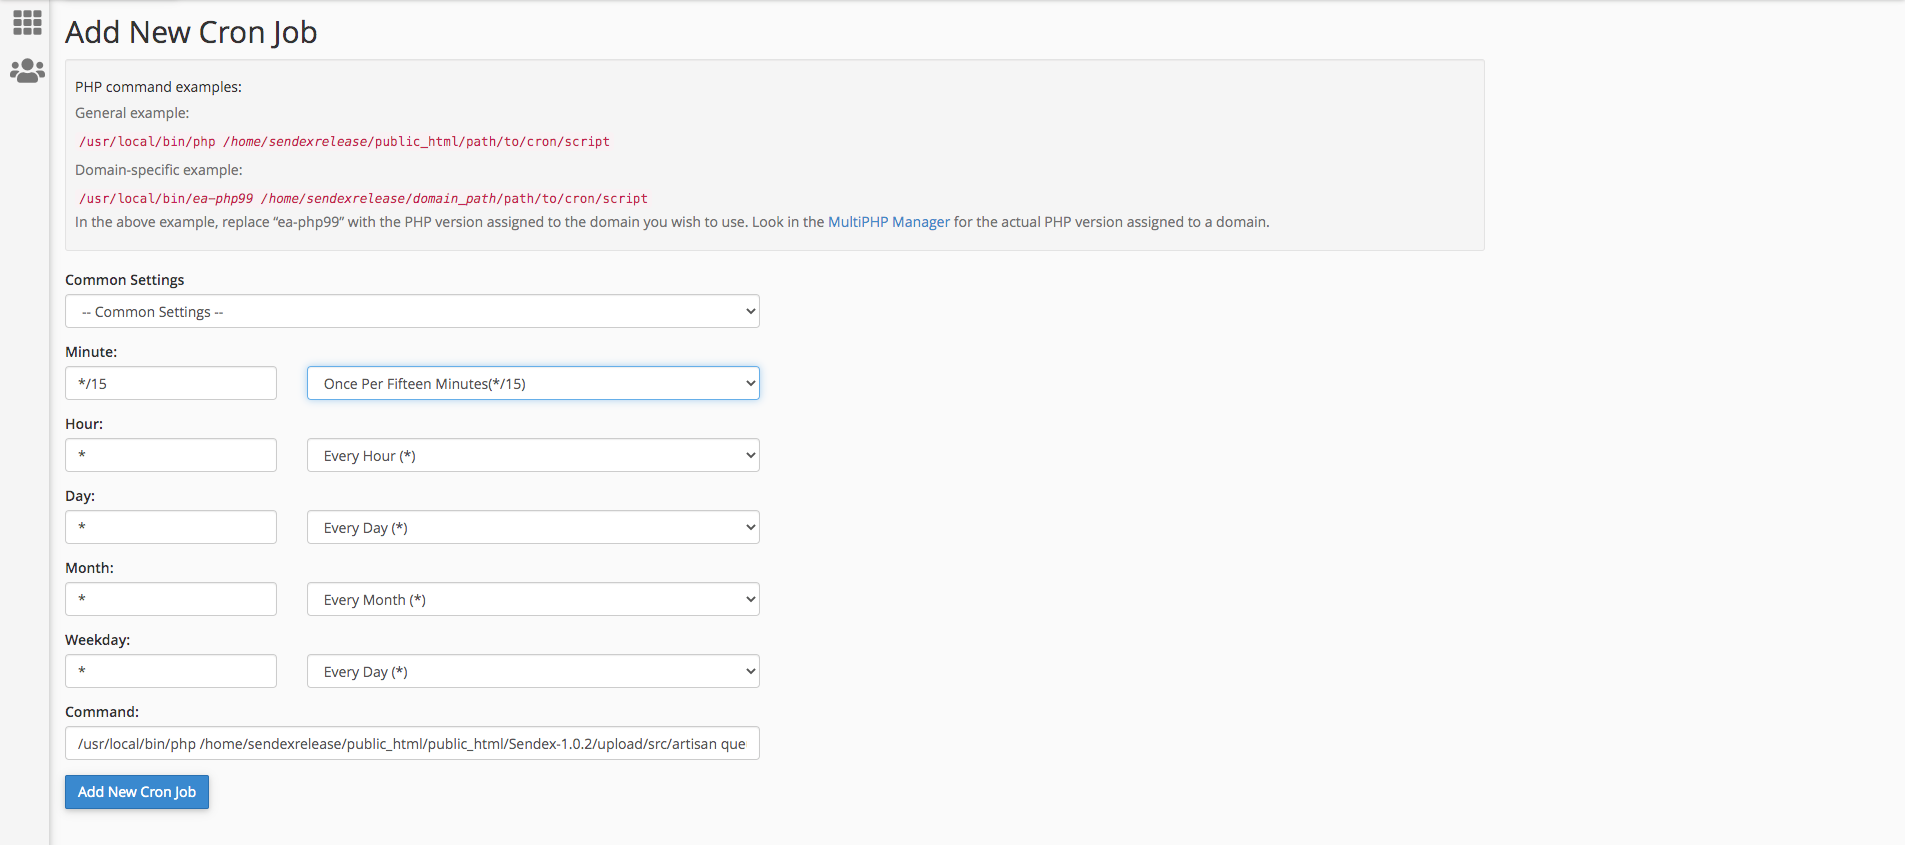
If you are using shared hosting from the hosting service provider and have a Cpanel/Control panel. Service Provider: Bluehost, DreamHost, Namecheap, HostGator
Cpanel: (Bluehost, DreamHost, Namecheap, HostGator - Service provider)
Add Cron Job to run scheduler:
- Search for the Cron Job in your cPanel.
- Click and go into the setup page for your Cron job.
- Select “Once per minute” from Common Settings.
- Run these commands in to the “Command:” field
/path/to/php
/path-to-your-project/src/artisan
schedule:run >> /dev/null 2>&1
/path/to/php
/path-to-your-project/src/artisan
queue:work --sansdaemon --tries=3 --queue=default
/path/to/php
/path-to-your-project/src/artisan
queue:work --sansdaemon --tries=3 --queue=high
Example:
Root domain:
/usr/local/bin/php
/home/mailer/public_html/src/artisan
schedule:run >> /dev/null 2>&1
/usr/local/bin/php
/home/mailer/public_html/src/artisan
queue:work --sansdaemon --tries=3 --queue=high
/usr/local/bin/php
/home/mailer/public_html/src/artisan
queue:work --sansdaemon --tries=3 --queue=deafult
Subdomain: [If subdomain directory is inside of public_html folder]
/usr/local/bin/php
/mailer/billar/public_html/folder_name/src/artisan
schedule:run >> /dev/null 2>&1
/usr/local/bin/php
/mailer/billar/public_html/folder_name/src/artisan
queue:work --sansdaemon --tries=3 --queue=high
/usr/local/bin/php
/mailer/billar/public_html/folder_name/src/artisan
queue:work --sansdaemon --tries=3 --queue=default
If subdomain directory is outside of public_html folder:
/usr/local/bin/php
/home/mailer/folder_name/src/artisan
schedule:run >> /dev/null 2>&1
/usr/local/bin/php
/home/mailer/folder_name/src/artisan
queue:work --sansdaemon --tries=3 --queue=high
/usr/local/bin/php
/home/mailer/folder_name/src/artisan
queue:work --sansdaemon --tries=3 --queue=default
Subfolder:
/usr/local/bin/php
/home/mailer/public_html/folder_name/src/artisan
schedule:run >> /dev/null 2>&1
/usr/local/bin/php
/home/mailer/public_html/folder_name/src/artisan
queue:work --sansdaemon --tries=3 --queue=high
/usr/local/bin/php
/home/mailer/public_html/folder_name/src/artisan
queue:work --sansdaemon --tries=3 --queue=default
Make sure there are no function that are called by the queue driver, such as, proc_open, pcntl_alarm, pcntl_async_signals,exec,shell_exec, pcntl_signal in the
disable_functions.If there any you’ll need to remove/enable those functions. Or you can contact with your hosting service provider.
Control Web Panel(CWP):
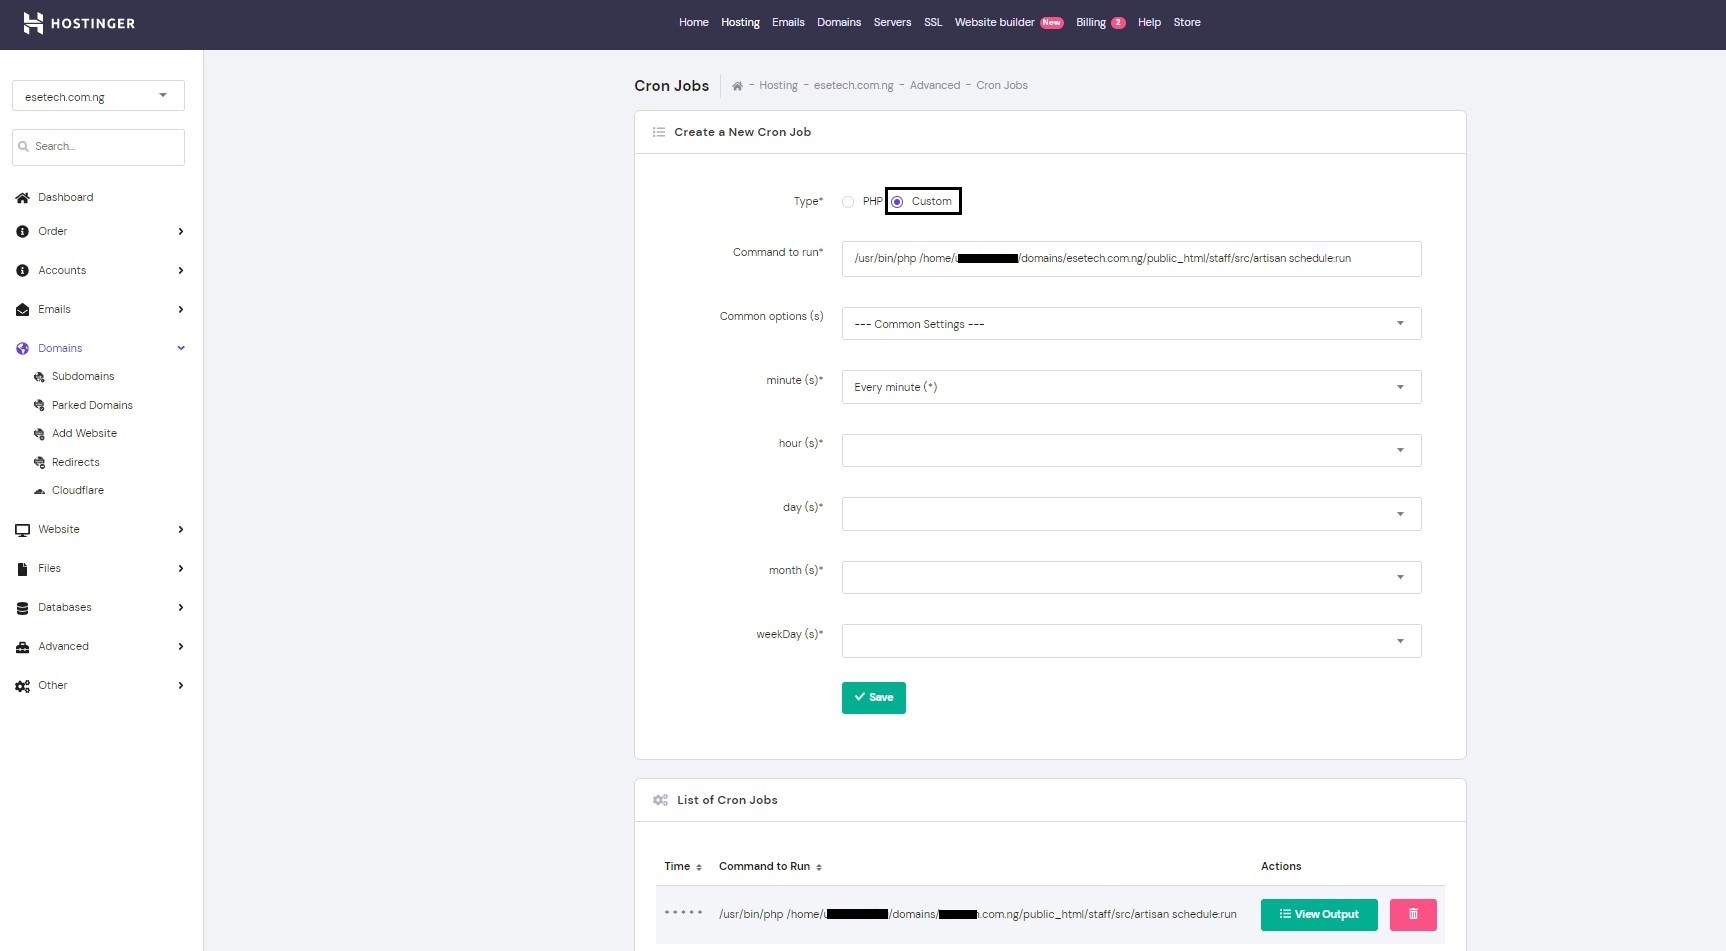
Hostinger hPanel:
Go to Cron jobs > select “Type: Custom” > Paste the provided command from the application settings without ( >> /dev/null 2>&1) these special characters. hPanel does not support special char in this server.
Command: /usr/local/bin/php /home/mailer/public_html/mailer/src/artisan schedule:run
Command: /usr/local/bin/php /home/mailer/public_html/mailer/src/artisan queue:work --sansdaemon --tries=3 --queue=high
Command: /usr/local/bin/php /home/mailer/public_html/mailer/src/artisan queue:work --sansdaemon --tries=3 --queue=default
DirectAdmin:
Remove the php path which we have provided, and paste the rest of the command.
Command: php /home/mailer/public_html/mailer/src/artisan schedule:run >> /dev/null 2>&1
Command: php /home/mailer/public_html/mailer/src/artisan queue:work --sansdaemon --tries=3 --queue=high
Command: php /home/mailer/public_html/mailer/src/artisan queue:work --sansdaemon --tries=3 --queue=default

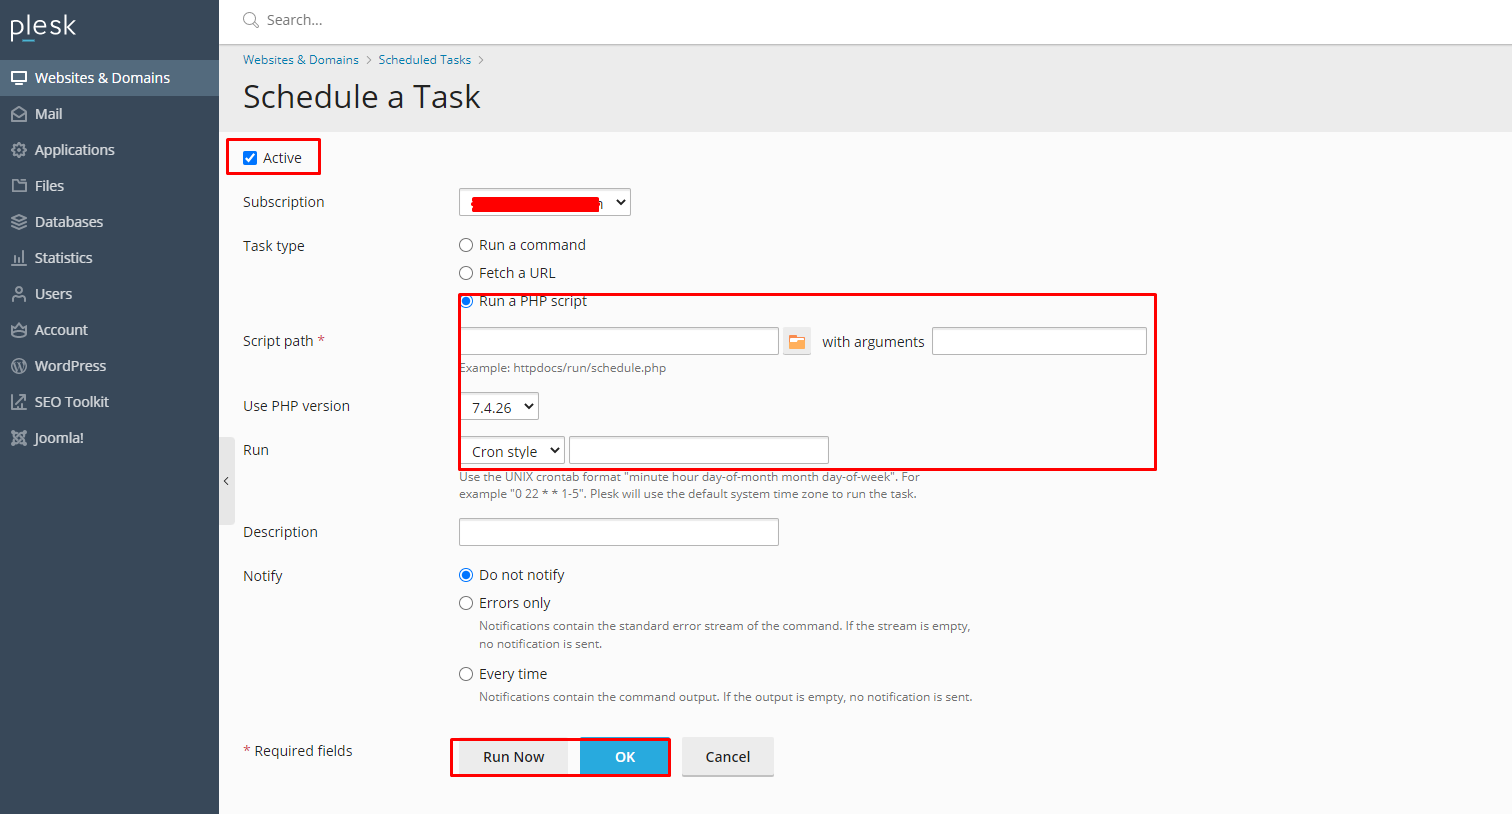
Plesk:
Go to Websites & Domains > Scheduled Tasks > Schedule a Task > Select “Task type: Run a PHP script” > Paste “Script path” [project_path] > Arguments schedule:run > Select PHP version [8.0] > Run: select Cron Style & input (*****) > save and run.
project_path: /var/www/xxx/xxxxx.plesk.page/httpdocs/mailer/src/artisan
with arguments schedule:run
project_path: /var/www/xxx/xxxxx.plesk.page/httpdocs/mailer/src/artisan
with arguments queue:work --sansdaemon --tries=3 --queue=high
project_path: /var/www/xxx/xxxxx.plesk.page/httpdocs/mailer/src/artisan
with arguments queue:work --sansdaemon --tries=3 --queue=default
VPS Server:
If you run the application in VPS server, then configure Supervisor to manage the Laravel queue. Otherwise Cron job doesn’t work. Please follow your service provider documentation to run Supervisor and Cron jobs.